Friday, March 18, 2011

Aerocet 3400s on a Cessna 206

Below is a progress of the float installation for N341EA, the Samaritan's Purse floatplane.  It was a really fun installation.  As always with a new installation, there are some snags and stuff, which for us can be amplified since we are in Kenya.  This makes things difficult for support and also for getting parts in a timely manner.  Aside from that, we made things work as much as possible and got some really good progress.  Enjoy the pictures!

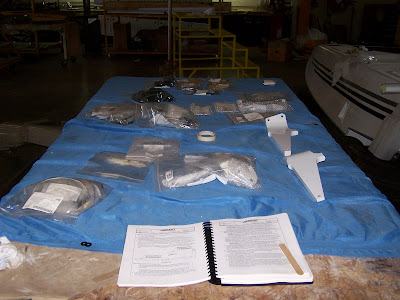
 The floats unpacked and ready for assembly.  
Getting the spreader bars ready to install.  
The "taka taka" - all the parts that come along for the install.  
Got 'em pointed the same direction and spreader bars ready to be installed.  
The water rudder.  This enables the aircraft to be steered while in the water.  
Tavasi getting the water rudder installed.  
Getting things in position.  The floats were "together" and the airplane was being prepped for hoisting.  
We have a really nice set of hoisting cables that we used.  Cessna recommends using cables at least 60 inches long, so the attach points are not damaged.  
Up in the air.  Time to get the land legs off!  
Sleek!  It almost looks like a 210!  
Tavasi looks happy with the installation of the ventral fin.  This is part of the floatplane modification.  
Up in the air!  I was on top manning the hoist, while Tavasi is measuring how high we are in the air.  We needed something like 72 inches from floor to belly to slip the floats underneath and allow some jiggle room.  
Seriously!  It looks like a 210 flying through the hangar!
Sliding the floats underneath...you can see we got a little higher than we needed. :)
Myself and Marko getting the front struts installed.  
Tavasi drove the hoist while we got all the struts semi-attached.  
View from the rear.  
Myself and Tavasi discussing the location of one of the cable pulleys.  Gotta love the ramen shirt!
Rear steps.  
Here's the emergency hydraulic hand pump (front) and the water rudder retract handle (the black thing closer to us), which are located on the floor between the front seats.  
The electric hydraulic pump assembly.  This is located on the left side of the rear fuselage, back in the tail cone.  You can see the empennage flight control cables on the left.  
Assembled.  You can see the crew steps mounted between the aft and mid struts.  Looks good!
Frontage!
So working on the engine is a little bit difficult on floatplanes, since it's so high up.  I found a nice long box that the ventral fin came in, and it worked really nice to work off of.  I was doing some work on the supercharger in this picture.  
Look closely in this picture...what do you see?  The gear is retracted!  This was my first retraction test...and it worked great!  I worked through the gear retractions a few times, trying to work out any bugs.  We only had a few small leaks, but everything worked great!  Praise the Lord!
Last shot of the day...

Thursday, March 10, 2011

Cessna 206 floatplane!


Here's my latest pictures of the floatplane.  And it actually looks like a floatplane!  We got the airplane into the back of the hangar where the hoist is and got it all attached and went to town on getting the floats installed.  I will post some more pictures later, but I wanted to get a couple pictures out for all my friends to see! This is the first Cessna 206 with a supercharged IO-550-N and also the first with this type of floats (Aerocet 3400 amphibs).  Sweeeeeeeet!!


Wednesday, March 9, 2011

JPI EDM-930 in a Cessna 206

The past week we have installed our third JPI EDM-930 here at AIM Air.  This time, we installed it into N827DG, the first Cessna U206G that I helped rebuild back in 2008.  It was a fun installation and we worked through it pretty well.  The first time we ran the engine, all things went well, and it has flown on a test flight as well with no problems.  That's always good!  Anyway, hope you all enjoy the photos. 

Here's the IO-550-N that's installed on 7DG.  You can see that it's been working hard for the past coulple years.  Africa really is rough on our airplanes...lots of difficult places we fly into around these parts.
The old instrument panel.  It was pretty much original Cessna engine instruments, except for an EI UBG-16, mounted in the panel just above the co-pilot yoke, where the original EGT gauge was located. 
Pulling out the UBG-16 sensor boxes, which were hidden above the glovebox behind the right side panel.  Looks like entrails getting pulled out. :) 
All the guts...this is all the old stuff, plus some of the items removed to facilitate removal/installation. 
Myself, working on getting the new instrument panel measured out. 
All the instruments removed, ready for a new panel. 
Fitting the new panel for the EDM-930. 
Fits great!
Here I am getting the RPM sensor installed in the RH magneto.  It's pretty much a pain since you have to put the sensor in the bottom of the magneto...meaning you have to either take off the magneto, or take off one of the induction tubes to twist the loosened magneto around enough to install the sensor.  Argh.
David, our avionics technician, getting his wire bundles together to be installed. 
Work in progress...wires hanging out, pieces missing...
David working  through his wire bundles. 
Here I'm getting the Remote Alarm Display (RAD) installed on the instrument panel.  You can see it on the top of the panel, just to the upper left of my hand...it's that little rectangle thing above and between the two flight instruments.  The RAD gives you information from the main display in case of exceeded parameters.  Otherwise, it normally reads RPM and manifold pressure. 
Myself, giving some input to Peter (our UK short termer) on installation of the fuel flow transducer and it's newly fabricated fuel lines. 
Caleb worked a bit on getting the wire harnesses on the engine sorted out.  He did a really nice job - it really looks nice and clean. 
All wire bundles ready for installation of the instrument panel and the display. 
Final installation of the new panel with the JPI EDM-930 installed.  
And the new panel.  Looks great!  

Thursday, March 3, 2011

Blue stripes!

We've got some color on CMA!  This week we got the blue stripes painted on the airplane, so it's beginning to look good again!  As most people say, "it's beginning to look like an airplane again."  I guess that's really only in the eye of the beholder...I've always seen it as an airplane, no matter how many pieces it is in!  Once the stripes are on, we begin doing some assembly and other odds and ends...this is really when it begins to take shape!  In the mean time, enjoy pictures of our progress!

Timothy getting the paint mixing bowl cleaned out.  
Myself and Timothy going over the correct way to clean the paint gun.  Don't I look like some sort of  hillbilly in my coveralls and gum boots?  Someone (an American) told me all I needed was a straw hat and a piece of grass sticking out of my mouth... :)
The carolina blue stripe down the fuselage...
...and on the vertical stabilizer.  
David wiping down some parts before the second batch of blue.  
Aaahhhh, the duke blue!
Registration numbers on the fuselage...
...and on the wing!  Most countries outside the US require that you put the registration numbers not only on the fuselage, but also on the bottom of the left wing.  And they have to be huge.  
The vertical stab, all painted and resting in the side of the paint booth.  Above the blue stripes will be the AIM Air logo sticker.  
The rudder, with stripes corresponding to the vertical stab.  
And the fuselage!  This certainly looks a bit different than CMA used to look like!  It turned out to be a fairly decent paint job, which is always good.  There are always some small things that don't look the best, but we're still learning how to be the best, right?!  Praise the Lord for His strength!